








Learning how to sew a button on pants is one of those practical skills that can save you time, money, and a trip to the tailor. Whether a button has fallen off your favorite jeans, your trousers need a replacement, or a waistband button has become loose, you can usually fix it at home with a needle, thread, and a few minutes of patience.
The good news is that sewing a button onto pants is not difficult. The most important things are choosing the right replacement button, positioning it correctly, using strong thread, and securing the stitches properly. Once you understand the basic technique, you can repair jeans, chinos, dress pants, school trousers, and many other garments with confidence.
“A small sewing repair can give a favorite pair of pants many more years of life.”
Why Learning to Sew a Button on Pants Is Useful
Buttons on pants experience a surprising amount of stress. Every time you sit, stand, bend, walk, or fasten your waistband, the button and thread are pulled in different directions. That is why a button that looks secure at first can eventually become loose or fall off completely.
Knowing how to sew a button on pants gives you a quick solution when this happens. Instead of throwing away a perfectly wearable pair of pants, you can repair the problem yourself. The skill is especially useful when you need a last-minute clothing fix before work, school, travel, or an important event.
It is also an inexpensive repair. Basic sewing supplies are affordable and can be reused for many different projects. With a small sewing kit containing needles, strong thread, scissors, and spare buttons, you can handle many everyday clothing repairs without professional help.
What You Need Before Starting
Before learning how to sew a button on pants, gather the correct materials. You do not need an advanced sewing machine or expensive equipment. A simple hand-sewing setup is enough for most button repairs.
Choose a needle that can pass comfortably through the button holes and fabric. You will also need thread that matches the existing stitching or the color of the pants. For jeans and heavy trousers, a durable polyester thread is often a good choice because it handles repeated tension better than very lightweight thread.
| Sewing Supply | Purpose | Recommended Choice |
|---|---|---|
| Sewing needle | Pushes thread through fabric | Medium or sturdy needle |
| Thread | Holds the button in place | Strong polyester thread |
| Scissors | Cuts thread cleanly | Small sharp scissors |
| Replacement button | Replaces the missing button | Similar size and style |
| Thimble | Protects your finger | Optional but useful |
| Seam ripper | Removes damaged stitches | Optional |
| Wax | Helps reduce thread tangling | Optional |
If you still have the original button, use it as your guide when buying or selecting a replacement. Matching the size, shape, thickness, and number of holes will make the finished repair look much more natural.
Choosing the Right Button for Your Pants
The button you choose can make a major difference. A lightweight shirt button may look attractive, but it may not withstand the pressure placed on a pants waistband. Jeans and work trousers generally require stronger buttons designed for heavier fabric.
When figuring out how to sew a button on pants, first consider where the button belongs. A waistband button needs to be particularly secure because it helps keep the garment closed. A decorative button on a pocket may not require the same level of reinforcement.
For jeans, you may encounter metal tack buttons rather than traditional sew-through buttons. These can require a different replacement method. If your pants originally used a metal tack button, replacing it with an ordinary thread-sewn button may work temporarily, but it can change the appearance and durability of the garment.
Preparing the Pants for Sewing
Before you begin sewing, place the pants on a flat, clean surface. Look closely at the area where the old button was attached. If the button fell off recently, you may still see loose threads or tiny holes showing its original position.
This is an important part of how to sew a button on pants because positioning affects how comfortably the pants close. If you sew the new button too far to one side, the waistband may pull unevenly. If it is too high or too low, the buttonhole may not line up properly.
Fasten the pants using the existing buttonhole and gently determine where the replacement button needs to sit. Mark the position lightly with tailor’s chalk or a washable fabric marker if necessary.
Threading and Preparing Your Needle
Cut a manageable length of thread rather than using an extremely long piece. A long thread may seem convenient, but it can become tangled while you work. Around 45–60 centimeters is usually comfortable for a hand-sewing repair.
Thread the needle and pull the thread through until the two ends are roughly even. Tie a secure knot at the ends. For heavy pants, you can make a small double knot so the thread is less likely to pull through the fabric.
If the thread is difficult to control, lightly running it through beeswax can help reduce tangling. This is particularly useful when working with thick fabric or multiple layers around the waistband.
How to Sew a Button on Pants Securely
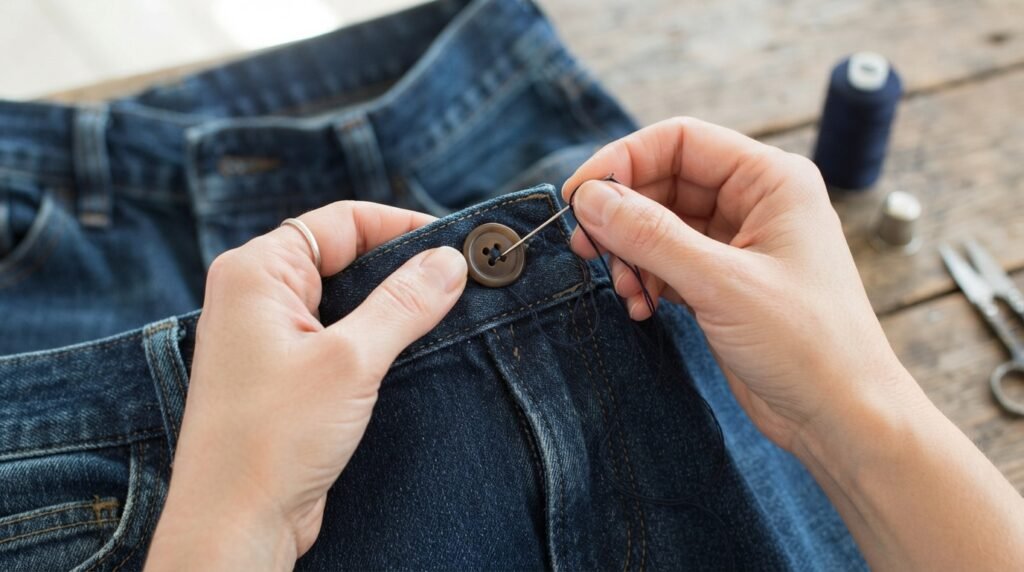
Now comes the main repair. Position the button over the marked spot and hold it firmly with your fingers. Insert the needle from the inside of the pants so the knot remains hidden against the fabric.
Bring the needle through one of the buttonholes and then pass it down through another hole. Pull the thread gently until the button sits against the fabric without becoming excessively tight.
Continue moving the needle up through one hole and down through another. If the button has four holes, you can create either parallel stitches or a crossed pattern. Both work well as long as the stitching is tight and evenly distributed.
The goal is not simply to attach the button but to create a strong connection between the button and fabric. Avoid pulling the thread so tightly that the fabric puckers. The button should have enough stability to withstand normal use while still sitting naturally on the waistband.
Creating a Small Thread Shank
Heavy pants often benefit from a little space between the button and fabric. This space is sometimes called a thread shank. It gives the fabric and button some room to move when the garment is fastened.
To create one, avoid pulling the button completely flat against the fabric with every stitch. After several passes through the holes, gently lift the button slightly and wrap the thread several times around the stitches underneath it.
This technique is particularly useful for thick denim because the buttonhole and waistband can be bulky. A small thread shank can make fastening easier and reduce excessive pressure on the button.
Securing the Button With Strong Stitches
Once the button feels stable, turn the pants inside out and secure the thread. Several small backstitches near the base can help prevent the thread from unraveling.
You can also make a knot close to the fabric and pass the needle through a small section of the fabric before cutting the remaining thread. This creates additional security without leaving a large visible knot.
When considering how to sew a button on pants, remember that finishing the thread is just as important as attaching the button. Even excellent stitches can fail if the thread is not properly secured.
How to Sew a Button on Jeans
Jeans require slightly different attention because denim is heavier and often contains several layers around the waistband. Use a strong needle and durable thread that can handle the thickness.
If you are attaching a traditional sew-through button to jeans, take care not to force the needle aggressively through several thick layers. Work slowly and use a thimble if the fabric is difficult to penetrate.
Some jeans use metal tack buttons. These are attached differently from ordinary sew-through buttons, so check the original construction before starting a repair. If the metal button has broken or the fabric around it is damaged, a denim repair method may be more appropriate than simply sewing on a replacement.
How to Sew a Button on Dress Pants
Dress pants typically use lighter fabric than jeans, so your approach should be more delicate. Choose thread that closely matches the pants and avoid creating bulky stitches.
When learning how to sew a button on pants made from wool, polyester, or other dress fabrics, concentrate on neatness. Small, even stitches will create a more professional-looking repair.
You should also avoid pulling the thread too tightly. Excessive tension can cause puckering, which may be visible when the pants are worn. The finished button should look as though it was originally installed by the manufacturer.
Common Mistakes to Avoid
One common mistake is using weak thread. Regular lightweight thread may work for a decorative button, but a waistband button needs to withstand repeated pulling and movement.
Another mistake is attaching the button without checking its position. Before making permanent stitches, test the buttonhole. The pants should close comfortably without excessive stretching.
Other problems include making stitches too loose, cutting the thread without securing it, and choosing a replacement button that is too large or too small.
| Common Mistake | What Can Happen | Better Approach |
|---|---|---|
| Weak thread | Button comes loose quickly | Use durable thread |
| Wrong position | Buttonhole does not align | Test placement first |
| Very tight stitches | Fabric puckers | Keep even tension |
| Loose stitches | Button moves excessively | Add several secure passes |
| No finishing knot | Thread unravels | Secure the thread properly |
| Wrong button size | Pants may not close | Match the original button |
How to Make a Button Repair Last Longer
A successful repair should survive everyday use. One of the best ways to improve durability is to use thread appropriate for the fabric. Strong polyester thread is a practical choice for many pants because it offers good resistance to repeated movement.
Another useful technique is reinforcement. If the fabric around the button is beginning to weaken, simply attaching a new button may not solve the underlying problem. You may need to reinforce the area with a small piece of fabric or additional stitching.
Avoid repeatedly forcing the button through the buttonhole. If the buttonhole is too tight, the stress can eventually break the thread again. A properly sized buttonhole should allow the button to pass through without excessive force.
How to Sew a Button on Pants Without a Sewing Machine
One of the best things about this repair is that you do not need a sewing machine. In fact, hand sewing is often preferable for buttons because you have greater control over stitch placement and tension.
If you are new to sewing, practice on a scrap piece of fabric first. Try attaching a spare button and pulling it gently to see how strong the stitches feel.
Once you understand the basic motion, how to sew a button on pants becomes a simple maintenance skill rather than a complicated sewing project. With practice, you can repair a loose button in just a few minutes.
When You Should Replace the Buttonhole
Sometimes the button itself is not the main problem. If the buttonhole has become stretched, frayed, or torn, a new button may not stay secure.
Inspect the buttonhole before completing the repair. If the opening is significantly damaged, reinforce the surrounding fabric or repair the buttonhole before attaching the replacement button.
A button and buttonhole work as a pair. Even a perfectly sewn button can fail if the fabric surrounding the buttonhole is badly worn.
Quick Comparison of Button Repair Options
Different pants call for slightly different techniques. Understanding the fabric and button style helps you choose the best method.
| Pants Type | Best Thread | Button Style | Main Consideration |
|---|---|---|---|
| Jeans | Heavy-duty polyester | Denim or metal button | Thick fabric |
| Chinos | Strong polyester | Sew-through button | Secure stitching |
| Dress pants | Fine matching thread | Flat sew-through button | Neat appearance |
| School trousers | Durable polyester | Standard button | Frequent use |
| Work pants | Heavy-duty thread | Strong utility button | Maximum durability |
| Lightweight trousers | Medium thread | Lightweight button | Avoid fabric puckering |
Helpful Tips for Beginners
If this is your first sewing repair, do not worry about making the stitches perfect. Strength and correct positioning are more important than achieving a professional tailor’s finish.
Use good lighting so you can clearly see the buttonholes and fabric. Keep your scissors nearby, but be careful when cutting thread. If the fabric is thick, a thimble can protect your finger from repeated pressure from the needle.
Another helpful tip is to keep spare buttons. Many pants come with an extra button attached to the care label or included with the garment. Store these somewhere safe instead of throwing them away.
“The best sewing repair is one that is strong enough for everyday life and neat enough to disappear.”
How to Sew a Button on Pants When the Original Button Is Missing
If the original button has completely disappeared, you can still make a good replacement. Look at the other buttons on the pants and choose one with a similar diameter, thickness, color, and number of holes.
You can also compare the buttonhole size. A replacement button should fit comfortably through the opening without being so small that it slips out accidentally.
Before sewing, position the replacement button and test it against the buttonhole. This simple check can prevent you from completing the repair only to discover that the pants no longer close correctly.
Conclusion
Learning how to sew a button on pants is a simple but valuable sewing skill. With a needle, strong thread, scissors, and a suitable replacement button, you can repair many common clothing problems at home.
The key is to focus on proper positioning, durable stitches, suitable thread, and a secure finishing knot. Jeans and heavy trousers may require stronger materials, while dress pants benefit from smaller, neater stitches. Taking a few extra minutes to prepare the fabric and test the buttonhole can make the repair much more reliable.
Once you become comfortable with the process, you will find that button repairs are quick and straightforward. Instead of replacing an entire pair of pants because of one missing button, you can restore the garment yourself and continue wearing it with confidence.
Frequently Asked Questions
How long does it take to sew a button on pants?
For a basic repair, it usually takes only a few minutes once you have your materials ready. Beginners may need a little longer while they work out the correct position and stitch pattern. With practice, the process becomes much faster.
What type of thread should I use when sewing a button on pants?
A strong polyester thread is a good general choice for pants because it handles repeated movement and tension. For lightweight dress pants, use a finer thread that matches the fabric. For denim or workwear, consider a heavier-duty thread.
Can I sew a button on jeans by hand?
Yes. Hand sewing works well for many traditional jeans buttons, especially sew-through styles. Because denim is thick, use a strong needle and durable thread. Metal tack buttons, however, use a different attachment method and may require a specialized replacement.
How do I know where to place the replacement button?
Fasten the pants using the existing buttonhole and determine where the button naturally needs to sit. The replacement should allow the waistband to close comfortably without pulling or twisting. Mark the position before making permanent stitches.
How many stitches should I use when sewing a button on pants?
There is no single required number, but several passes through each buttonhole usually provide a stronger repair than only a few stitches. For pants that receive heavy use, make enough passes to keep the button stable and finish with a secure knot.
Can I sew a button on pants without a sewing machine?
Absolutely. A sewing machine is not necessary for a button repair. In fact, hand sewing gives you precise control over the button position and thread tension, making it particularly suitable for this type of small repair.
Why does my button keep falling off after I sew it?
The problem may be weak thread, insufficient stitches, incorrect positioning, or weakened fabric. The buttonhole may also be creating too much tension. Use stronger thread, reinforce the area if necessary, and make sure the button is properly aligned before sewing.
Should a button sit directly against the fabric?
Not always. For thicker pants, leaving a small amount of space and creating a thread shank can make fastening easier and reduce stress on the button and fabric. Lightweight trousers may require less space depending on the original construction.